In this part, I’ll discuss where and how I got the logo belt, suit, shoulder patches and gloves. I wanted to get the costume ready for Halloween, so I only had about a month and half and out of that time, I was away on a business trip for nine days. There was no way I could make everything from scratch.
Jumpsuit
While I own a sewing machine, my experience using it is mostly for making small pouches, various of straps and belts and repairing stuff. I’m interested in learning sewing for making costumes, but it just had to wait. I didn’t have time to improve my sewing enough, get patterns and materials and get other parts of the costume done. Instead of trying to make a jumpsuit, I did some online shopping to find something suitable.
I wanted a body-hugging material suit with long sleeves and with a slightly textured surface that wasn’t too shiny or matte. I knew 1 mm neoprene with a lycra cloth surface would look nice, but long sleeve full suits are generally way too hot to wear indoors. Luckily, I found the Rip Curl G-Bomb ladies long sleeve springsuit. It’s available in various colors, among them a pure black suit. It has a nice front zip that goes just far enough down to work with this costume. The zip locks in place securely in any position, making it easy to adjust the amount of visible cleavage. I found the wetsuit for under $50 (+ shipping and taxes) – I knew I could use it without ruining its function as a wetsuit, so I felt it was a good deal.
On the negative side though, there is a silvery Rip Curl logo on the chest and another left arm near the shoulder. The ridge around the logo peeled off pretty easily and I covered the logo with the black marker, but it is still visible in photos. I tried removing the logo with acetone, but I didn’t want to ruin the neoprene, so I gave up when the silver color didn’t seem to come off easily. Neoprene is somewhat resistant to acetone, but I was worried about damaging the suit.
The arm logo is a bit lower on the arm than the shoulder patch on the Black Widow uniform, but putting the S.H.I.E.L.D. patch on top of it was clearly the best way to hide it neatly. I bought some fabric arm patches on Ebay and then later noticed that they were negatives of the ones in the Avengers costume. I found and bought another set of patches before Halloween, but ended up liking the first set better anyway and used them despite the black/white reversion. The first patches have a hooked velcro back. This meant that I could easily remove the S.H.I.E.L.D. logos from the wetsuit when it wasn’t used for cosplay. Still, the patches weren’t exactly accurate in terms of material & looks. I used Liquisole to attach the loop side velcro patches to the suit. Liquisole is quite good for gluing something like that (very strong), but it takes overnight to cure, so make sure you have time, if you want to use it.
There’s a shirt and a bodysuit version of the springsuit. I bought the bodysuit because I knew it wouldn’t ride up under any conditions and it would be more useful as a wetsuit as well. The crotch doesn’t snap open, so going to the bathroom is complicated and not really advisable. I suspect bathroom complications are a common problem for cosplayers…
For the legs, I tried to look for neoprene leggings, but found compression tights instead. The material isn’t neoprene, but the surface texture and color are actually very close. I guess the lycra is quite similar. 2XU Women’s compression tights are available with black on black graphics. The price was a bit high for my Halloween budget, but this was also something that could still be used elsewhere. Even though the black on black logo is visible in photos, it doesn’t look out of place in the costume. Together with the tactical belt, the top and bottom can be made to look like a seamless jumpsuit. As far as my Halloween costume was concerned, I was happy with what I had.
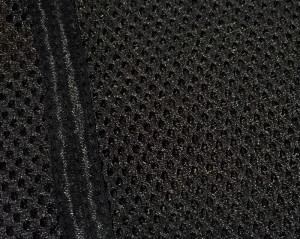
For winter/spring 2016, I have started researching materials and patterns in order to make my own suit from scratch. It’s still too early to say much about this, but the sample swatch of black spacer mesh I got from Moodfabrics might be the right fabric. I’ll write another article about this once I have something more concrete to show.
Improved Insignia
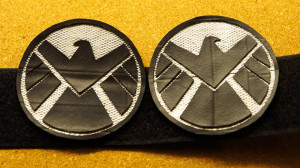
For Halloween, the shoulder patches were from Ebay and didn’t look quite right. Writing this series, I started upgrading pieces of the Halloween costume with improved versions. For the shoulder patches, one plan was to 3D print a S.H.I.E.L.D. logo stencil or mold and then make my own patches. Before I had a chance to get start 3D-printing stuff, I came up with a way to make the patches with common and easy materials. The prototypes were promising, but the first two patches looked a bit messy because I used too much glue. The third patch turned out almost perfect, but I made a slight layout mistake with the pieces and had to redo that one as well. The process works, but requires precision to get the best possible results. If the patches do not need to be super durable, you can get some rubber or foam sheets with adhesive already on one side and skip all the nasty parts that involve rubber glue and long drying times.
Here’s what I used:
- A bicycle inner tube, 1.75″
- Some rubber glue (Liquisole)
- I wanted a velcro back, so I used two slices of 5 cm (2″) wide velcro, but this is optional
- A printer and some paper
- Water-soluble glue stick
- Silver spray paint
- Wax (baking) paper
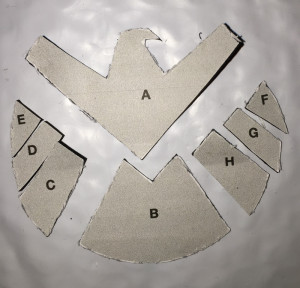
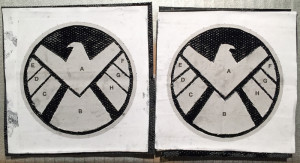
I used Autodesk Graphic (formerly known as iDraw) to draw the logo. I started with a photo reference in a background layer and set up guidelines for drawing. Three concentric circles for the black perimeter and the wing + tail edges and then the straight lines in the logo. Once I had the guidelines in place, I converted the inner parts into polygons or bezier curves. I then reduced the logo to the size I wanted and labeled the parts so that they would be easier to recognize and place on the patch once they were cut out. I duplicated the patch and mirrored the body to turn the head of the eagle the other way for the other shoulder. I then duplicated these two patches three times on a sheet. I printed out the patches on paper, making sure I had plenty of spares. I was new at this, so I had a hunch I would end up making more than two shoulder patches before I got it right.
I cut a segment from the rubber inner tube and then cut it lengthwise to make a square. The rubber square needs to be large enough to cover the whole logo and then some. I washed and dried the rubber square and (optionally) sanded the side with ridges on it. The smooth side is then covered completely with glue stick and a printed logo is applied over the glue. At this point, it’s good to let the glue dry properly so that it doesn’t come loose while you are doing the next steps. I placed a flat weight over the rubber/paper composite to keep it from curling while it was drying. Patience is king.
Once the paper glue had set, I cut the gray logo pieces. I found it best to start cutting inside the white area above the eagle’s head and cut out the circle around the patch along the inner line. A good pair of scissors works really well here. I used two pieces of 5 cm wide velcro as the backing. The patch is wider than 5cm, so the two pieces are used to form one larger piece about 10cm × 10cm in size. Another bit of velcro held the two sides together until the glue had dried and the patch was ready. I squeezed some glue directly on the velcro and made sure all of it was really well “wetted”. It’s OK to use a little bit of excess glue. Next, I used the glue on the velcro to wet all the rubber bits needed for the patch. I moved the bits to a piece of baking paper with the glue side down and slid them around like slugs, leaving a trail of glue behind. This got rid of excess glue and to made sure the glue is applied evenly. Then, I applied some baking paper on the velcro and use it to smooth and squeeze out all excess glue from the velcro. I used pressure to really work it into the velcro. Excess glue will stick to the baking paper. The thinner the film of glue, the faster and better it will cure.
For best results, the glue needs to settle for at least a few minutes before laying out the pieces onto the backing. I started out with the outer circle, then the tail (B), body (A) and wings (CDE & FGH). At this point, it’s really important to use an uncut version of the logo as reference. I thought I was familiar with the logo and skipped it on the third patch I made, only noticing my mistake the next day when it was way too late to do anything about it. Can you spot my mistake? The patch looks nice enough, but it’s just wrong, so I let out a deep sigh and I decided to redo it one more time…
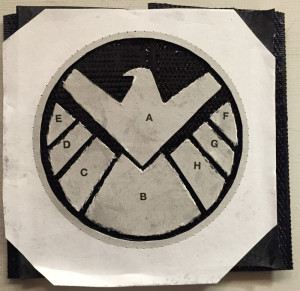
The parts are glued down. Can you spot my mistake? Always use a reference drawing/photo when making something.
I enveloped the patch in baking paper. The paper is nice because it’s translucent, so you can see if anything has moved out of place without actually lifting it. I placed some stone tiles on the patch for weight and then applied a bit of pressure. I went back to check the result about 20 minutes later and made some fine adjustments to positions. At that point, it’s still possible to move the pieces slightly. After that, the baking paper and weights go back on and the whole thing is left to cure overnight.
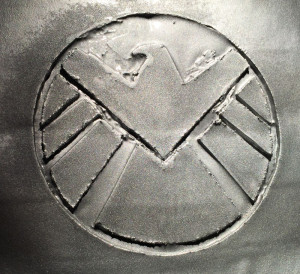
The whole patch painted. The parts covered with paper are still black underneath. This is the first prototype. I used too much glue and tried to remove some of it, leaving nasty marks.
The next day, I used a pin to mark the outer border of the patch with tiny holes in the paper. I used spray paint on the patch before cutting the round outline, so painting over the paper will hide the print, but the pinholes are clearly visible and work well as a reference for cutting the patch out once the paint has dried. Once the paint is completely dry, the whole patch can be soaked in water for a while. This will soften the paper glue and allow the paper to be peeled off cleanly, leaving a clean black rubber surface.
Until Next Time…
The next article will cover the logo belt, boots and gloves.
