Status Update
I planned the original series to have 10 parts and hoped that this tenth part would largely based on any feedback and question I got from people reading the first nine articles. So far though, there haven’t been any questions and relatively little feedback.
I’ll just give a quick overview of where I have been and what I have been doing cosplay-wise and follow up with some more detailed articles later on.
January
Right after New Year, the capital area cosplay organization held a dance ball very close to where I live. A friend of mine was going there and had an extra ticket, so I went along with her. The reception to my costume was hugely positive even though it wasn’t much of a dance ball costume. The party also included a visitor vote for queen & king of the ball and I was hugely surprised that I was voted queen. It was truly an honor to be chosen. At the moment, the event page still has a photo of the crowning, but I think it’s just the header image for the organization. The venue also posted some photos here and on Flickr (I don’t think I’m in any of the Flickr photos). Finally, there are some studio shots here.
So next year I will hopefully be going back to the cosplay ball to crown my follower. I have an idea for a new costume that should be more befitting the occasion… The prize also included a VIP entry ticket to the Cosvision convention in April.
As you could see from the previous post, I created a new version of the Widow’s Bites using 3D printing. Part of the idea was to get them to light up a bit brighter, but in hindsight, that would require two LEDs per pod, so the end result wasn’t much brighter than the original. However, the new ones do look a bit better than the first ones I made. I’m slightly tempted to make a third version, 3D-modeling the pods using Fusion 360 rather than Blender, doubling the number of LEDs and adding transistors to drive them much brighter. Using CR2032s wouldn’t be practical with that version.
February
In February, I did a road trip along the California/Oregon coastline and found myself in Portland just in time for Wizard World. I was rather tired on Friday and had a tight schedule on Sunday, so my cosplay was limited to Saturday. I had a good time and enjoyed the panels. There’s a couple of photos of me on S. Shadow’s Natural Photography gallery on Facebook (thank you!).
While I was in the United States, I also picked up my Mood Fabrics order for spacer mesh and brought it with me back to Finland. I managed to sew a new suit around Easter time. I’ll write a full post about the suit later on…
March & April
The new suit was ready about two weeks before CosVision, so that left me with time to work on some other things as well. The guard belt I had ordered from eBay never arrived, so for Portland, I just made something quick to use with the Cobra buckle. For Cosvision, I had enough time to buy a new belt from Ebay.
The two weeks after I had completed the suit were also enough to put my full attention on making new utility belt pouches. The original 3D-printed ones were just props that didn’t do anything interesting and that I had modeled in Blender as my learning project. The new version pushed me to become much better at using Fusion 360 and I’m really happy with how it turned out. Even though I had a clear specification of what the end result should look like, it still left me a lot of work in terms of making a design that functions and prints well. The new version is printed in five different pieces and includes some simple electronics. The discs have a reed (magnetic) switch that lights up a blue & red LED inside the disc if you pull them out from the pouch. The design looks very close to the Avengers utility pouches even though I left out a little bit of fine detail that just didn’t print very cleanly and caused some 3D-modeling headaches as well. The utility pouches would be a good topic for another blog post… 😉
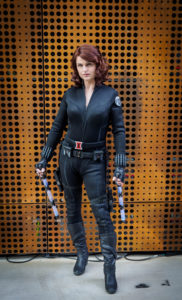
I’ll write about Cosvision & other stuff in another post, but here’s one of the photos my friend took of me while I was there.

Practically every piece of the costume upgraded since Halloween… Best of all, this is the suit I made.
3D Printing
Aside from tailoring the suit, most of my spare time has gone into 3D-printing related activities. Upgrading bits of the costume is a good excuse for firing up Fusion 360 and making something interesting. I have a new version of the logo buckle that actually is a functional belt buckle and will probably upgrade it further so that the black center part works as a release button (no promises though). I now have two 3D printers. In addition to the Wanhao i3, which I have been upgrading & tinkering with, I also bought a Fabrikator Mini from Hobbyking. I think I’ll write a separate article on my thoughts on these printers and possibilities of using low cost 3D-printers for making cosplay props.
I have also used 3D-printing to make molds for Smooth-On Dragon Skin silicone. I have silicone-cast SHIELD patches, but I didn’t buy any psycho paint, so I haven’t tried coloring them, so I’m still using the patches I made in December. The silicone was actually for something much bigger and it took a few tries, but I managed to get a finished product. Maybe more on that in a later post…maybe…